How do I create a test campaign?
Creating a test campaign
A test campaign allows you to view one of your emails as your prospects would. This allows you to verify that your links, as well as your variable tag data such as {{FirstName;Default=}} are functioning properly.
To do so, you will have to send the email in question to your own email address from PUBLITRAC's platform. Ensure that your URLs do not have spaces or special characters in them. If they do, please ensure that you properly encode them.
1. Create a test list with minumum 25 email addresses (see article How do I create an empty list?). You might name your list "Internal Test List" or "QA" for example.
2. Create a lead in your name, with your email address (see article How do I create a lead?). Create leads for each of the 25 email address to which you would like to send your test email.
3. Add these leads to your test list (see How do I add a lead to a list?).
4. Create an automation campaign (see How do I create an automation campaign?).
5. Select your test list as a sending list for your campaign.
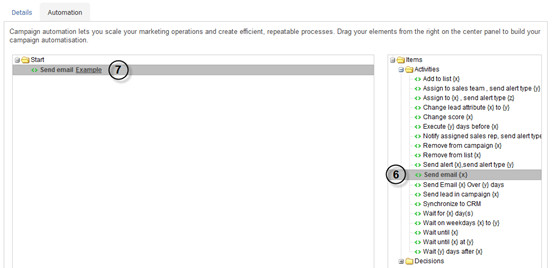
6. From the Automation tab, create the automation rule Send email {x}.
7. Select the email you wish to test.
8. From the Details tab, Activate your campaign.
The email you'll receive should include all variable tag data.
For example, if you used the {{FirstName;Default=}} tag, you should see your first name displayed in place of the tag.
Links will also be tracked/rewritten by the system and will be displayed using your vanity tracker domain.
Related articles
