How to send a campaign from a sales rep.?
The following steps should be taken prior to activating your email campaign:
- In the Leads tab, sort all leads by last name and ensure there are no duplicates
- You’ll need to test all of your campaigns before activation. To do so, follow the steps outlined below:
- Create test leads using all the fields you’ll be using, including all custom fields
i. When creating test leads, we recommend uploading a .CSV file that contains the same fields as your original leads.
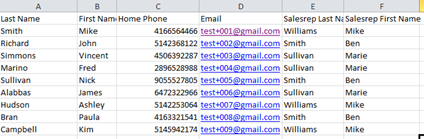
ii. We recommend creating a Gmail account for testing purposes, for example test@gmail.com. In the leads list, enter the test
email address for each
lead with a +001 before the “@” symbol. (I.E test+001@gmail.com, test+002@gmail.com etc). See screenshot below for a visual
explanation.
- Create a new campaign and add the test list you have created in ii. Use the send email activity and select the email created. You should see the following information in the Details tab.
The number of leads should be equal to the number of leads in your list. - Activate your test campaign
- Check your email, you should have received all of your test emails. Once received, check the following:
i. The correct email was received
ii. The email subject is correct
iii. Click all the links in your email
iv. The unsubscribe link is working
v. Verify that the field data is replacing the email tags
vi. If you have a view online link, verify that it is functioning
vii. If you have refer a friend enabled, verify that the link works
Now that your test is completed, go back to the Details tab of the Automated campaign section. There shouldn’t be any more affected leads because they should all be treated.
4. Now that your test is complete, it is time to check the real email automation. First things first, check your lead count vs your campaign’s lead count. To do so:
- In the Details tab of the campaign automation section, you will see “this campaign will affect X Leads”. X should equal the number of leads in your list.
- In the Details tab of the campaign automation section, you will see “this campaign will affect X Leads”. X should equal the number of leads in your list.

In this example, the number of leads in the “montreal_area” list should equal the number of affected leads. To see the number of leads in your list, select the list in the leads tab.
5. If you are using the send as salesrep functionality make sure:
- You map the sales rep first name and last name to the appropriate salesrep fields
- The sales rep name in PUBLITRAC matches the name in your lists
- The sales rep name does not exceed 50 characters
- There are no special characters in the salesrep name (i.e: $, ‘, “, /…)
- There are no default values assigned in the salesrep tags. (i.e {{SALESREP_NAME;Default=}}), there should be no text entered between the “=” and “}” symbols.
If you write something, that value will be displayed if no salesrep is associated to the lead. - If a salesrep is assigned to the lead, PUBLITRAC will replace the From (Do not write the email address) and From Address fields values with the salesrep values
that are associated to the lead. - You are now ready to Send out your official campaign!
Related articles