Set up event campaigns (Conventions, etc.)
Pre/post event communication campaigns, registration management, customized event pages per participant,... PUBLITRAC helps you plan your events.
Firstly, you must configure the forms that will be used to collect registrations, changes in registrations and cancellations.
Subsequently, a landing page will be produced for each of the forms created.
Then you will schedule the automated campaign which will launch the invitations to your contacts and make the appropriate reminders on the non-answered invitations.
Step 1. Create the custom fields you'll need for the planning of your convention
1.Go to the Parameters ![]() and click on Settings.
and click on Settings.
2.Select the Custom Fields tab.
3.Click Add. Enter the custom fields that you will use to track the organization of your convention. For example: type of members, number of tickets, food preference, etc. We recommend the creation of a custom field Cancellation of Registration with a stored default value to true which will allow you to identify the cancelled registrations.

Step 2. Create three different forms: Registration Form, Modification to the registration form and Registration Cancellation Form
4. Go to Contents, select Form.
5. Click Add and complete the Information required on your new form that will contain the necessary fields for the Registration to the convention. For example: name, family name, Telephone #, Email, and the custom fields created in the previous step.
Click Add and complete the Information required on your new form that will contain the necessary fields for a change to a registration already made. For example: name, family name, Telephone #, Email, and the custom fields created in the previous step.
Click Add and complete the Information required on your new form that will contain the necessary fields for a cancellation of a completed registration For example: name, family name, Telephone #, Email, and the custom field ``Cancellation of the Registration``.

Step 3. Create three landing pages on which your forms will be present (registration, change, cancellation)
The first being the landing page on which the lead can register for your convention via the registration form. In this page, it is recommended to include links to the two other landing pages. For example: Click here to submit a modification to a registration already made; and Click here to submit a cancellation of a registration.
6. In the Content menu, click on Landing Page.
7. Click Add and complete the required Information on your new landing page to encourage leads to sign up to your convention. This page should contain the registration form created in the previous step. Do not forget to include the links to the other landing pages that will be created to facilitate the cancellation or modification of a registration.
Click Add and complete the required Information on your new landing page, which will take into account the changes to an existing registration. This page should contain the modification form created in the previous step.
Click Add and complete the required Information on your new landing page, which will take into account the cancellations of registrations. This page should contain the cancellation form created in the previous step.

Step 4. Create six emails
You must create six different emails that will affect leads at several pre-established steps during their subscription process to the convention.
8. In the Content menu, select Email.
9. Click Add and create an Invitation to the convention email. This email should include a link to the register landing page created in the previous step.
Click Add and create a Registration Reminder email for those leads who are not yet registered. Highlight a deadline for registration. For example: only 10 days left to register for our convention. This will increase your subscription rate. Don't forget to include the link to the Registration landing page.
Click Add and create an email confirming the registration request made by the lead. For example: We have received your registration for the XYZ convention on the (date) .
Click Add and create an email confirming the change request for an existing registration. For example: We have received your request to change your registration for the XYZ convention.
Click Add and create an email confirming the cancellation request for an existing registration. For example: We have received your request for the cancellation of your registration for the XYZ convention.
Click Add and create an alert email (optional) which will be triggered whenever a lead signs-up for the XYZ convention.

Step 5. Create your invitation list
Create a list of all leads who will be invited to your convention. You can either create an empty list to add specific leads, import a list of leads, or you can create a filtered list based on specific criteria. The filtered list will serve as a reminder to the guests who have not responded to the original invitation.
Create a filtered list
You must create a filtered list including all the leads who will have registered for your convention.
10. In the Leads menu, click on Leads/Customers.
11. Click on the List Management tab and then click on Add.
12. Choose the option Create a filtered list.
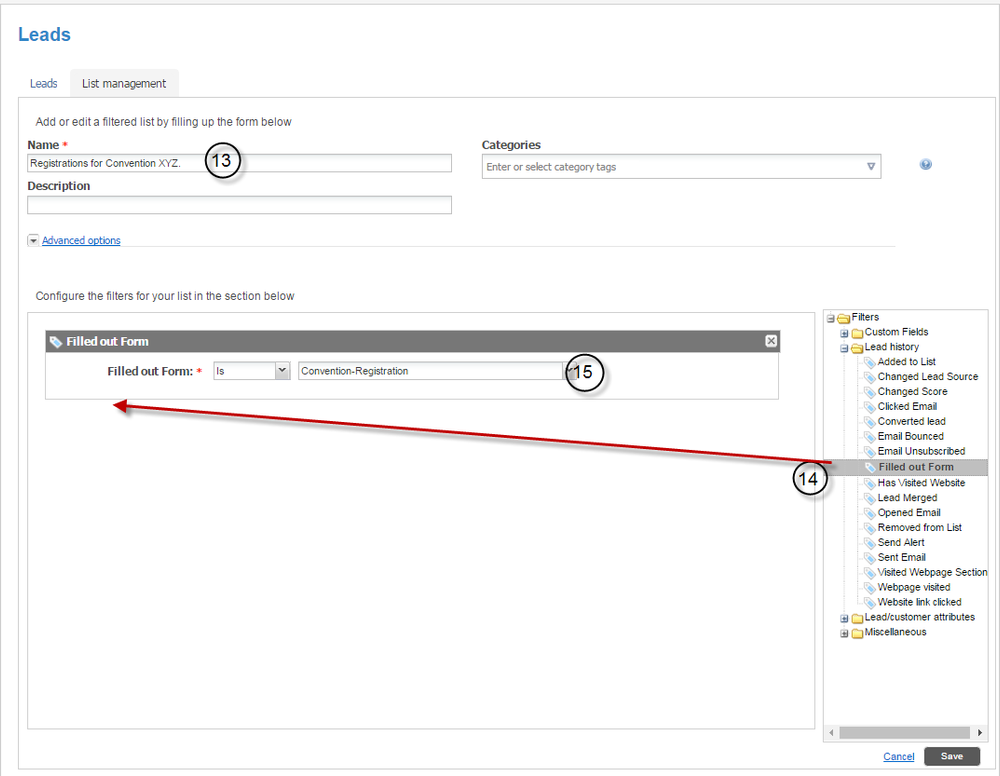
13. Name this list, for example, Registrations for convention XYZ
14. From the Lead history folder, drag the activity Filled out Form to the left section.
15. Select the Is condition, and choose the registration form created in step 5.


Create an empty list
1. Go to the Leads menu - Leads/Customers

2. Click on the List Management tab
3. Choose Add

4. Choose the option Create an empty list

5. Name the list.
6. Click on Save.

Do the same for Registration Changes and Registration Cancellations.
Step 6. Create five automated campaigns (invitation, reminder, confirmation, amendment, cancellation) to interact with your leads at specific times during their subscription process for the convention.
Create an invitation campaign
- In the Campaigns menu, click on Configure automation campaign
- Click Add and complete the information required to create a campaign.
- Name the campaign Invitation and select the List of the people who will receive this invitation.
- Click on Next
- Navigate to the Automation tab, drag the activity Send email (X) to the left and insert the invitation email created in the previous step.

Create a reminder campaign
- In the Campaigns menu, click on Configure automation campaign
- Click Add.
- Name * the campaign Reminder for invitation to the convention.
- Enter Email as the Category *.

- Click Next.
The screen below appears.

- Select Lists.
- Select the filtered list created in the previous step (the one grouping the leads registered for the XYZ convention.
- Select the filtered list of the participants who have responded. (do we choose 2 lists?)

- Click on Next.
- Navigate to the Automation tab.
- Under the Decisions / Lead folder, select Lead member of list (x).:
- In the Yes flow, do not add anything.
- In the No flow, add the activity Send email (X) and choose the Registration Reminder Email created in the previous step.

This campaign will affect the leads who are not yet registered for the convention and prompt them to register.
If you specify a deadline in your registration reminder email (for example: only 10 days left to register for our Conference), you must include an activity related to time (ex: wait until the (X) to (Y)). This will increase your subscription rate. Do not forget to include the link to the registration landing page.
Create a campaign that will confirm the registration for the convention
- In the Campaigns menu, click on Configure automation campaign
- Click Add.
- Name * the campaign Confirmation of Registration for the Convention.
- Enter Email as the Category *.

- Click on Next.
The screen below appears.

- Select Triggers.
- Drag the Filled out Form trigger to the left side of the screen.
- Choose the condition Is.
- Select the Convention Registration Form created in the previous step.
- Click Next.
- Select the Automation tab.
- In the Activities folder, select Add to the list (x) and drag this activity to the left.
- Select the empty list of Leads having completed the form created earlier.
- Drag and drop the activity Send email (x) to the left.
- Select the email confirming the registration created in the previous step.

If you want to receive an alert when a new lead confirms his registration for the convention, add the activity Send alert {y} to {x} following the automation. Enter the email address where to send the alert and select the alert email created earlier in the type of alert field.
Create a campaign that will confirm the modification for a registration already sent
- In the Campaigns menu, click on Configure automation campaign
- Click Add.
- Name * the campaign, for example, Confirmation of Modification for the Convention.
- Enter Email as the Category *.

- Click on Next.
The screen below appears.

- Select Triggers.
- Drag the Filled Out Form trigger to the left.
- Choose the condition Is.
- Select the Convention Registration Modification form created in the previous step.
- Click Next.
- Select the Automation tab.
- In the Activities folder, select Add to list (x) and drag this activity to the left.
- Select the empty list of Leads who completed the form created earlier.
- Drag and drop the activity Send email (X) to the left.
- Select the email confirming the Change Request for a registration created in the previous step.
- You can also send an alert to the person in charge or to the assigned sales representative. Add the activity Send alert {y} to {x} following the automation. Select the previously created alert email.

Create a campaign that will confirm the cancellation of a registration already sent.
- In the Campaigns menu, click on Configure automation campaign
- Click Add.
- Name * the campaign Confirmation of Cancellation for the Convention.
- Enter Email as the Category *.

- Click on Next.
The screen below appears.

- Select Triggers.
- Drag the Filled out Form trigger to the left.
- Choose the condition Is.
- Select the Convention-Cancellation form created in the previous step.
- Click Next.
- Select the Automation tab.
- In the Activities folder, select Add to list (x) and drag this activity to the left.
- Select the empty list of Leads who completed the form created earlier.
- Drag and drop the activity Send email (X) to the left.
- Select the email confirming the Cancellation Request for a registration created in the previous step.
- You can also send an alert to the person in charge or to the assigned sales representative. Add the activity Send alert {y} to {x} following the automation. Select the previously created alert email.
