6 - Configuration (user account, account information (tracking code, CNAME, Favicon), company profile)
PUBLITRAC is a web application (web based or cloud), so it requires no installation on your workstation. It is accessible from a Web browser (Explorer (IE9 +), Chrome, Firefox, etc). The platform is https secured, just like a banking site and is available in French and in English. Three initial configurations (tracking code, CNAME and company profile) must be put in place before starting with PUBLITRAC. The creation of PUBLITRAC users however requires the intervention of your PUBLITRAC client manager.
User account
The creation of PUBLITRAC users requires the intervention of your PUBLITRAC client manager. You will need to provide the name, family name, email address as well as the type of access you want for each user to add in your PUBLITRAC account (user access: access to all the features of the customer account platform; or salesperson access: limited access to view and update the leads included in the lists associated with the salespersons). Your manager will create the user. To view your user profile (you can't however edit it), proceed as follows:
1. Click on the  icon (top right hand corner of the screen), and then click Settings.
2. Choose the User account tab and fill in the required information. The information displayed are the ones that can be edited by the user. The other information should be changed by the client manager.
3. Click Save.
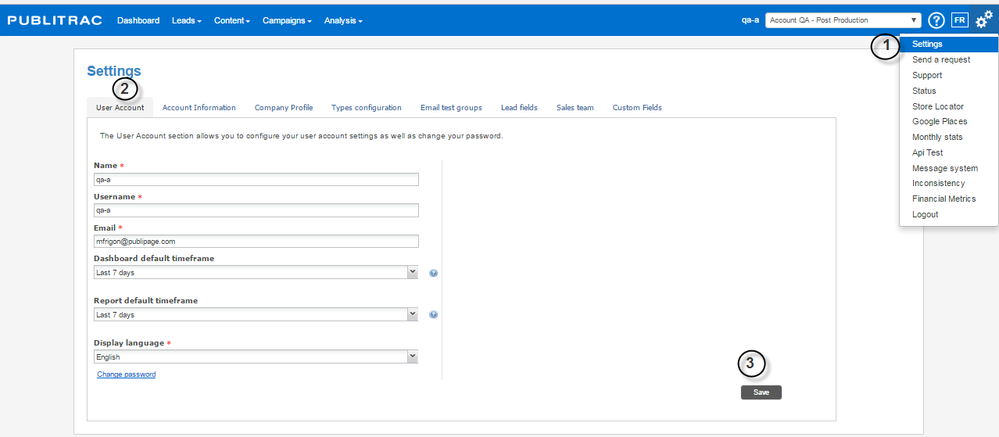
Default period - Dashboard: determines the default period for which the user’s thumbnails/widgets will be displayed in his PUBLITRAC homepage.
Default period - Report: determines the default period for which the user’s performance reports will be displayed (accessible via the Analysis tab).
Display language * : PUBLITRAC allows the setting of the language by user and by account. English-speaking users can consult PUBLITRAC in English and French-speaking users can consult PUBLITRAC in French.
Change my password: allows you to change the password.
Account information
Two of the three basic settings necessary before starting with PUBLITRAC must be completed from this tab: Tracking code and CNAME.
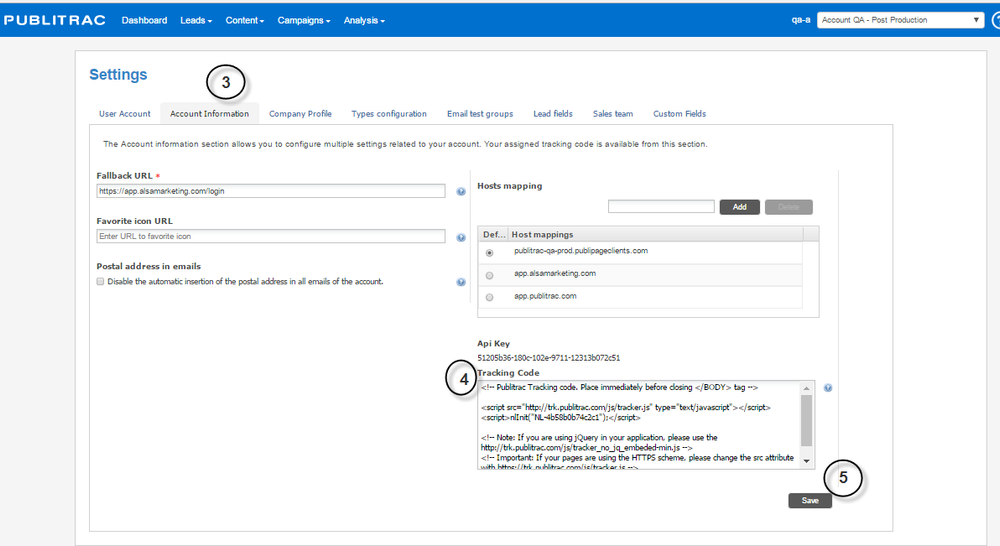
Configure the tracking code
The tracking code allows to profile and track the behaviors and interests of your leads. It is installed instantly on all the pages of your website (same principle as the installation of the Google Analytics tracking code) by following the steps below:
1. Log in to your PUBLITRAC account.
2. Access your Parameters by clicking on the ![]() icon (top right corner of the screen), then Settings.
icon (top right corner of the screen), then Settings.
3. Select the Account information tab.
4. Copy the code displayed in the Tracking code box. It must be pasted just before closing the < /BODY > tag. Depending on your level of comfort with HTML code, you may have to turn to your technology team for this step.
5. Click Save.
Description of the fields displayed in the Account information window:
Unsubscribe URL: under Bill C-28, an unsubscribe link is required on all emails. PUBLITRAC will automatically insert, by default, an opt-out URL on your email. However, you can register your own URL that will direct to your opt-out page by completing the Unsubscribe URL field. Once Saved, PUBLITRAC’s default URL will be deactivated and your unsubscribe URL will be displayed in your emails.
Unsubscribe email text * : text confirming the opt-out, that will appear on the screen of the person who wants to opt-out, as soon as he/she clicks on the unsubscribe link. The text generally used confirms that no other email will be sent to this person.
Alternative URL * : when a landing page, an image or content cannot be found by a user, rather than see a pop-up, error 404 on the screen, the user will be redirected to the page indicated by this link (generally it redirects to the homepage).
Favorite icon (Favicon) URL: allows you to configure your business’s "My Favorites" icon that will appear in the URL of your browser bar. See how to set up your favorite icons under Configure your Favicons (favorite icon URL) below.
Mailing address in emails: an address is obligatory on all emails under Bill C-28. PUBLITRAC will register automatically, by default, the mailing address that is in your company profile. However, you can display the mailing address of your choice by completing this field. Once Saved, the default address (the one registered in your business profile) will be deactivated and the other address will be displayed in your emails.
API key : code to connect to the PUBLITRAC API.
Tracking code : allows to profile and track the behaviors and interests of your leads. It is installed instantly on all the pages of your website (same principle as the installation of the Google Analytics tracking code). It must be pasted just before closing the </BODY> tag.
Google Analytics account number: optional
The subdomain mapping: you must enter here the CNAME that you created (see Configure the CNAME below).
Domain name: it is possible to configure multiple subdomains within the administration screen. This section displays the list of configured and validated subdomains.
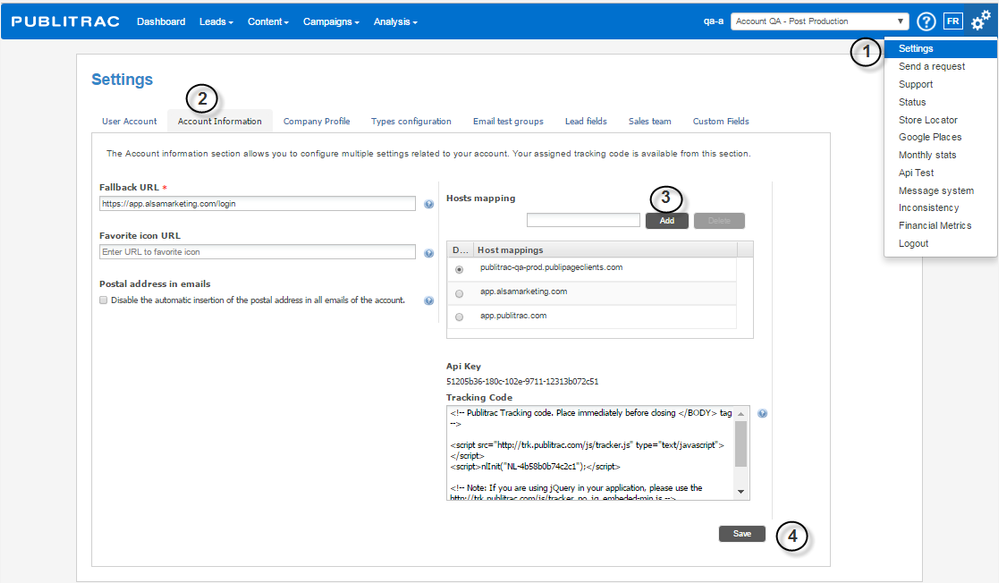
Configure the CNAME (also called Subdomain mapping or Host mapping)
This step is to create a subdomain (alias) that will point to PUBLITRAC so that the images, files and landing pages are displayed with your domain name (for example offre.votredomaine.com) and not PUBLITRAC (app.publitrac.com). By changing the IP address of a record, all your CNAME records pointing to that record, automatically follow the new IP. Always consult a Web administrator before configuring this section. Technical knowledge is required.
Three steps are required to configure a CNAME:
- Configure a CNAME: modify the DNS file of the domain name, and then, when entering the DNS add a CNAME that will point to app.publitrac.com. Be sure to point to PUBLITRAC’s domain name and not the IP address. For example: configure a 'redirect' for the CNAME nouveauCNAME.votredomaine.com which will point to app.publitrac.com. This guarantees the proper functioning in case of a change of the IP address. The subdomain can be named as desired.
- Map the subdomain in PUBLITRAC
1. Access your Parameters by clicking on the ![]() icon (top right corner of the screen), then Settings.
icon (top right corner of the screen), then Settings.
2. Select the Account information tab.
3. Add the CNAME created in the Domain Mapping. Click Add.
4. Click Save when the success message is displayed at the top of the screen. If an error message appears, you must reconfigure the CNAME following the instructions above.
- The last step is to Validate the subdomain mapping : we recommend using the NSLOOKUP (Name System Look Up) tool to interrogate a name server in order to get information about a domain or host (this tool is available in English only). This allows to diagnose possible DNS configuration problems. For example, from NSLOOKUP , enter the following command: nslookup nouveauCNAME.votredomaine.com . Make sure that it matches the alias: app.publitrac.com . It is possible to configure multiple subdomains within the administration screen. You need to set the default domain name. We recommend to use only a single subdomain in your communications.
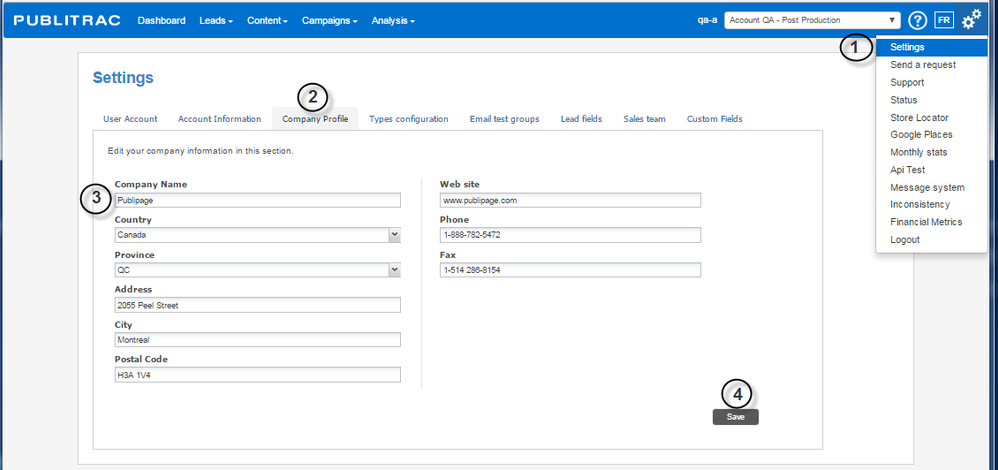
Configure the company profile
Once the tracking code and the CNAME configured, you can connect to PUBLITRAC to enter your company profile information. This information is important since Bill C-28 requires that some of the information be displayed on your emails (unsubscribe URL, mailing address). Once the information about the company profile properly configured, if you forget to add the information required by Bill C - 28 on your email, PUBLITRAC will automatically generate this information from the information contained in your company profile.
1. Go to your Parameters by clicking the ![]() icon (top right corner of the screen), then Settings.
icon (top right corner of the screen), then Settings.
2. Select the Company profile tab.
3. Complete the information related to your business.
4. Click Save.
Configure your Favicons (favorite icon URL)
Allows to display your favicon on the tab of the internet browser. This configuration is not required before starting with PUBLITRAC, but is generally done at the moment when the Account information is configured.
1. Click on the ![]() icon (upper, right of the screen), then on Settings
icon (upper, right of the screen), then on Settings
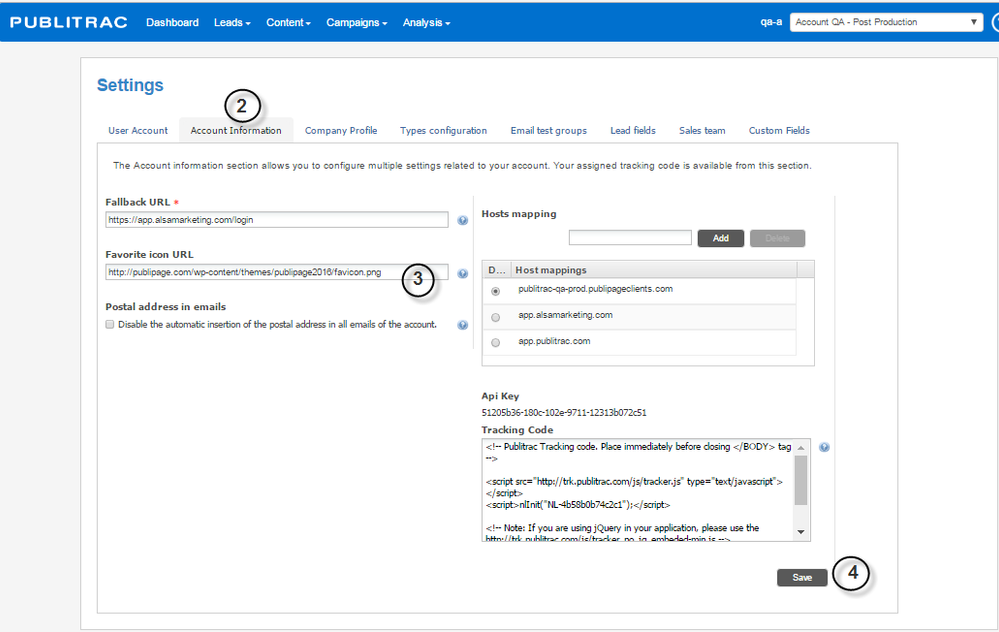
2. Select the Account information tab.
3. Enter the URL pointing to the favorite icon in the favorite icon URL field.
To create your favicon
1. To use the favicon saved in PULBITRAC:
a. Save your image in a .ico of 16 X 16 or 32 X 32 pixels format. Some browsers now accept .png or .jpg in addition to the .ico image formats.
b. Import your image in PUBLITRAC’s Images and documents.
c. Double-click on the image to open it.
d. Copy the URL and paste it on the configuration page.
2. To use the favicon on your website
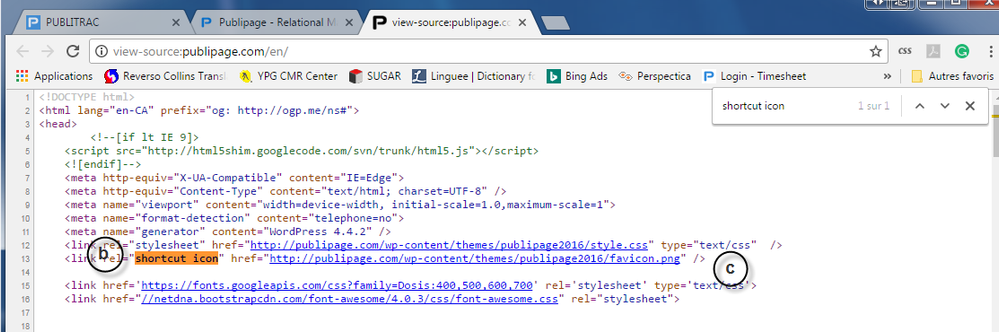
a. From a page on your website, right-click on the mouse on the page and choose Display the source code of the page.

b. Click on Ctrl-F to open the search box, enter shortcut icon. Click Enter to activate the search.
c. Copy the URL link appearing after the href . In our example, http://publipage.com/wp-content/themes/publipage2016/favicon.png
3. Paste the link in the Favorite icon URL field.
4. Click Save.
This icon will be displayed by default on the internet browser tab used for emails and landing pages. If no icon is configured, the PUBLITRAC icon will be displayed.

 TIPS
TIPS
- Addition to the white list of your email server. We recommend adding the server and IP addresses listed below on your email server’s white list. These domain and IP addresses are those used by PUBLITRAC’s email servers. By identifying them in your white list, your emails will never be blocked by your own email servers.
70.38.100.0/24
209.172.40.80/28
209.172.40.192/26
- Addition to your DNS. It is possible to add the SenderID and your DomainKeys to your DNS. In this way, PUBLITRAC will be allowed to send emails from your domain, which will improve your rate of receipt of emails and will give a more professional look to your campaigns. Each host and DNS provider handles the addition of information differently. There is no process that works everywhere. The addition of SenderID and DomainKeys to your DNS is a very technical step, only your network administrator will know how to set up your DNS changes.
- Before referring the new DNS entries to your administrator, Configure the CNAME in PUBLITRAC.
- The DNS Manager allows you to add information for DKIM/DomainKeys and senderID. If an SPF record already exists for your domain, you should only include nouveauCNAME. yourdomain.com without removing the existing values. For example: v = spf1 include:newCNAME.yourdomaine.com.
- Other configurations: it is not necessary to proceed with the implementation of each available configuration in PUBLITRAC before starting to use it. Only the Account user, Tracking Code, CNAME and Business profile are required to start. You can then proceed to the other configurations depending on your needs, and your use of PUBLITRAC.
Top of Form
Bottom of Form