A To complete with Michel Frigon.
A form inserted on the contact page of a website, or on a landing page posting a contest or on pages such as: “download, at no cost, our whitepaper”, “Subscribe to our newsletter”,... is an excellent tool for creating leads. It allows you to obtain the required consent to communicate with your leads (under Bill C-28), in addition to collecting basic information (name, address,...).
...
Step 1. Create a hosted form (form created from PUBLITRAC)
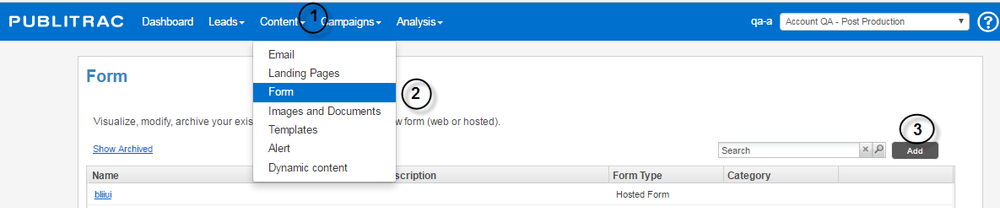
1. Select Content.
2. Select Form.
3. Click Add.
The
...
screen below
...
appears.
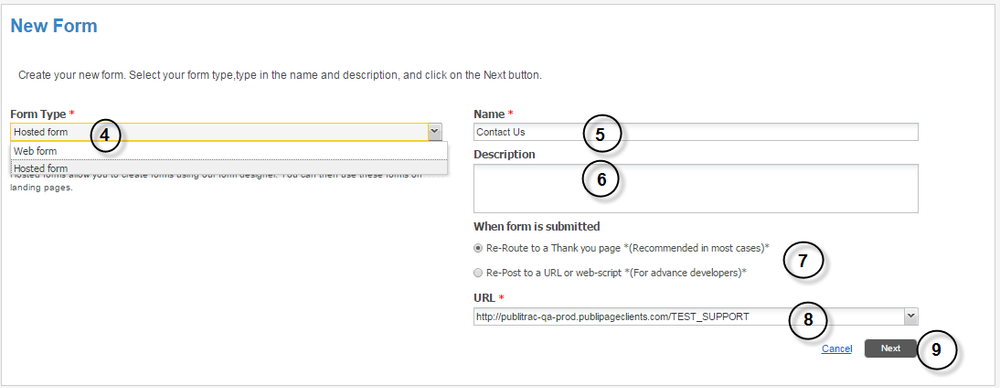
4. Select Hosted Formfrom the Form Type
...
* drop-down menu.
5.
...
Name your form.
6. Add a Description(optional).
7. Select one of the following two options under When
...
form is submitted:
...
Re-Route to the
...
Thank you page(Recommended in most cases) *.This option will automatically trigger the sending of a web page that you will have configured according to your needs. For example, We have received your completed form or Thank you for completing this form, ...
...
Re-Post to a URL or to a web script *(For
...
advanced developers) *.The difference with the thank you page option is that you have the choice to direct to a landing page or to a web process that you have developed. An experienced developer should be involved in the execution of this redirection.
8. Select the URL*of the landing page that will be sent to the lead which will have completed the form. For example, the landing page We received your completed formwill be sent once a form has been completed. The URL’s that will appear on the drop-down menu are the ones you will have registered previously. You can also enter a different URL (or copy and paste) which will direct you to a landing page which does not exist in the drop-down menu. The created URL’s remain in memory and are displayed on the drop-down menu.
9. Click Next.
The
...
screen below
...
appears.
...
The name of your form is displayed at the top left (in our example, Contact us).
...
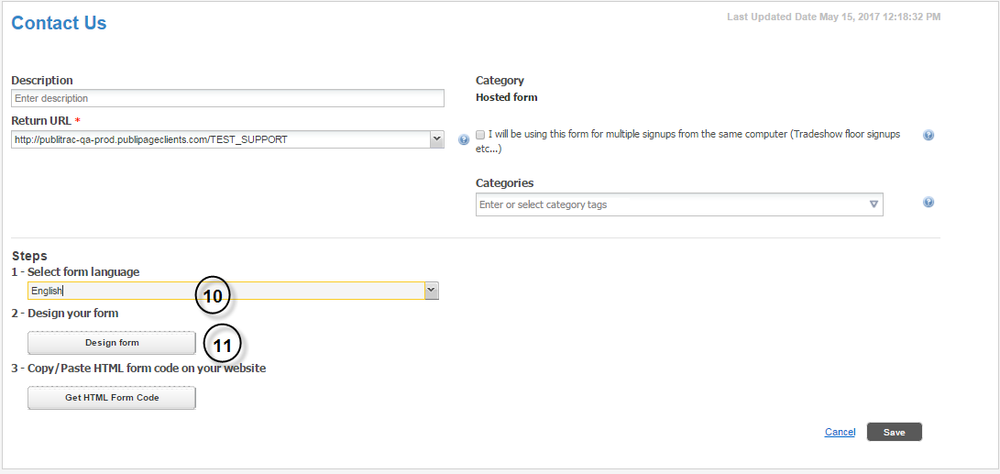
10. Choose the language of the formfrom the drop-down menu. You will have the option to choose between English and French.
11. Select Design the form.
The
...
Form design window is displayed. This form configuration tool allows to build the displayable fields on your form.
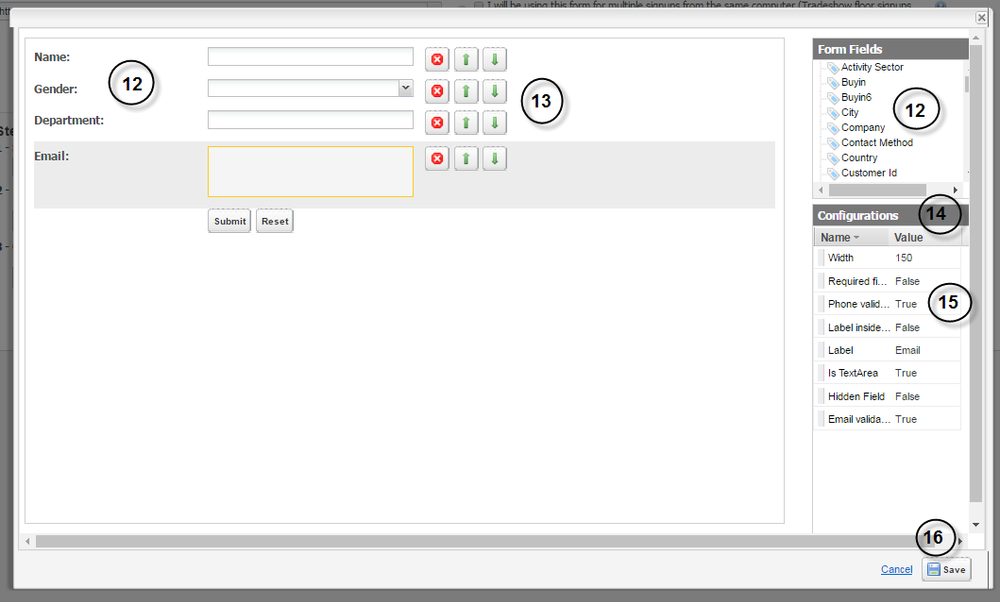
12. Select, from the drop-down menu, to the right of the screen, under the Form Fields section, the field to be displayed on your form. In our example, we selected Email and slide it to the left side. The fields available in the drop-down menu are the fields that you will find on the Details lead page (default and custom fields).
13. Change the order of the fields by using the green arrows  , or deletea field by clicking on
...
the ![]() icon.
icon.
14.-15. Specify the value (true, false,...) to assign to the fields on your form (the default value displayed under the Configurations section is always a non-forced value, that is Falserather than True).Click on the field to be changed (on the left side. The line of a selected field will be grayed out, see Email in this example). Identify the fields that are not required by selecting the value False.
...
Hidden field: by selecting the value True, this field is not visible to the lead. It can be a pre-populated field on the landing page from which the form is coming from. Therefore a field that the lead does not need to see.
Required
...
Field: by selecting the value True, the lead cannot complete the form until this field is filled in.
Text field: by selecting the value True, this field becomes free of value constraints. A text field can contain numbers as well as text. So there are no content restrictions when true is selected.
Width: allows you to adjust the width of your field on the form. The values are in pixels.
Wordinginside the field: by selecting the value True, you can enter a viewable text in the selected field of the form (example, please enter your email address). This value is entered in the configuration Wording.
Wording: enter the name of the field to display on the form if you have selected
...
Truefor Wording inside the field.
Email validation: by selecting the value True, the system ensures that the format of the entry corresponds to a valid email format (for example, must contain @yourdomain.com ).
Phone validation: by selecting the value True, the system ensures that the format of the entry corresponds to a valid phone number format.
16. Click Save.
The Contact
...
Us form that we viewed in point 11 is redisplayed.
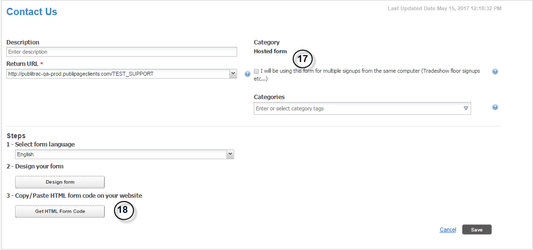
17. Check off the box
...
I will be
...
using this form for multiple signups from the same computer . Manage multiple listings is used when multiple users share a same workstation, from a same IP address.
18. Click
...
Get HTML Form Code.(only if you do not use the form available tag in the editing tool of the landing pages. For hosted forms, you have access to a tag in the WYSIWYG of the landing pages which allows you to insert the form using the drop-down menu).
A window displaying the HTML will open. This is the source code of the form that you will be able to manually insert on your landing pages (web).
You have just created your hosted form. You must now either:
2a. Insert the hosted form in one of the pages of your website.
2b. Insert the hosted form in a landing page created from PUBLITRAC.
Step 2a. Insert a hosted form in one of the pages of your website
1. Click Content.
2. Select Form.
3.Select the form to insert on your website and click on the name of the form to access it.
The
...
screen below
...
appears.
4. Click on Get the HTML code of the form.
The
...
screen below
...
appears.
5. Copy the code.
6. Click on OK.
7. Navigate to the code of your website page on which you want to insert the form. This step must be performed by your IT team. The websites are all specific and the integration of a form by the HTML code must be made by an experienced user.
8. Copy the code saved in point 5 on the webpage.
9. Save.
Step 2b. Insert a hosted form in a landing page
1. Click
...
Content.
2. Select Landing
...
Pages.
The
...
screen below
...
appears.
3. Selectthe landing page on which you want to insert a form and click on the name to open it. For our example,
...
landing page mcote 20161013-2.
The
...
screen below
...
appears.
4. Clickwith your mouse on the place on your landing page where you want to insert the form.
5. From the menu bar of the landing page, from the drop-down menu, select the Hosted Form to be inserted. In our example, we will insert the Contact Us form
...
.
The
...
screen below
...
appears.
6. Your formis inserted.
7. Click Save. Your landing page is saved and the form is integrated.
8. The final online result will be as follows:
Modify a hosted form
1. Click on the hosted form that you want to edit from the list of forms displayed under Content/ Form.
The window screen below will be displayedappears.
2. Update the Description,the return URL, the language of the form and/or the Categoriesas desired.
3. If you want to modify the form fields, click on Design the form. Make the required changes.
4. Click on Save.
Note:If you inserted this form in the form of a tag on the landing page, the modifications will be automatically applied to the page in question.
...
Cascading Style Sheets, or feuilles de style en cascade, is a computer language that is used to describe the presentation of1 HTML documents.)
1. Select Content.
2. Select Templates.
3. Click Download CSS forms. This will launch the download of the complete CSS (Cascading Style Sheets) used for the layout of the PUBLITRAC forms.
4.Use the code extracts below to further customize your forms.
Format the input list fields
5. Insert the new styles between the tags < head > and < head > in the Edit screen for the landing page. If you are having problems with your styles, add Important at the end of the style line to give it importance.
Example:
Archive a form
1. Click on Content/ Formand select the form to be archived from the list of forms.
2. Click Archive. You cannot delete a form. You can archive it and thus reactivate it later if you wish to use it again.
TIPS
- When using the HTML icon to copy and paste the HTML code from the form hosted in the landing page, the information obtained from the completed form will not be updated automatically in the event where you would make any changes to the form in PUBLITRAC (unlike the tag which allows the automatic update).
...