Create a salesperson
1. Click on the ![]() icon (top right corner of the screen), and then click on Settings.
icon (top right corner of the screen), and then click on Settings.
2. Select the Sales team tab.
3. Click Add.
The screen below appears.
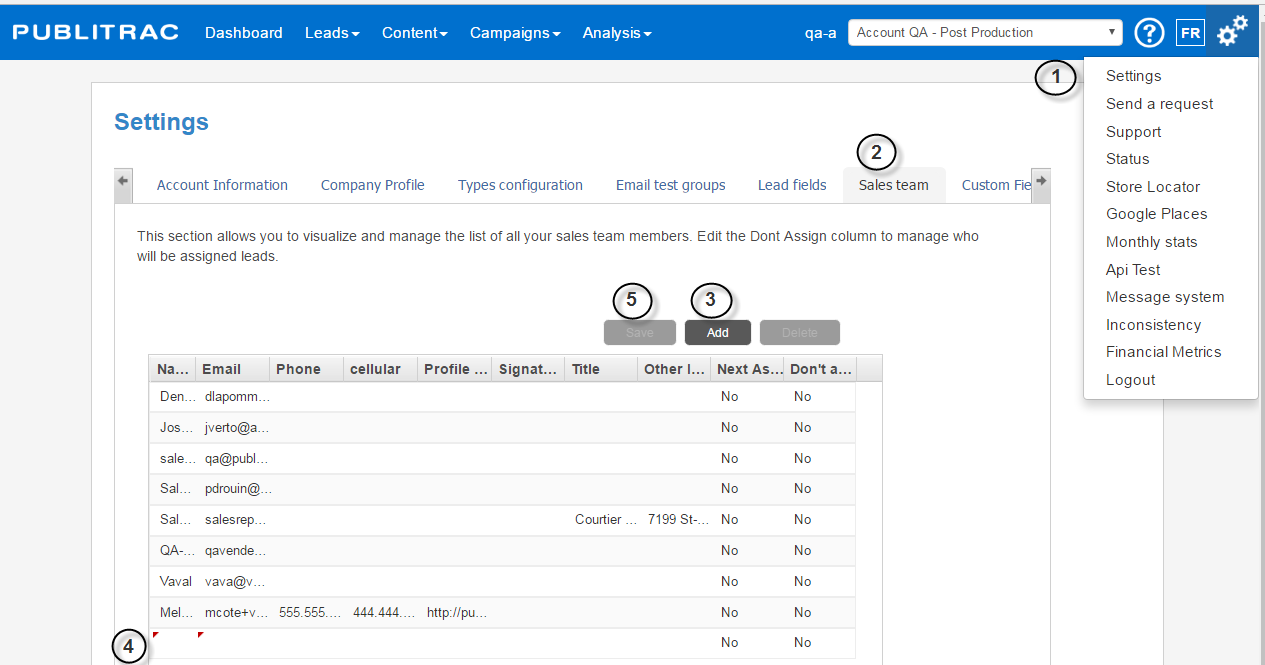
4. Add the name of the salesperson and the relevant information.
5. Click Save.
Send a campaign on the part of a salesperson
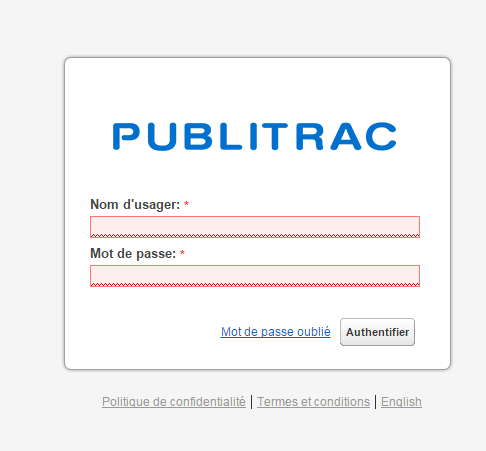
1. Login to PUBLITRAC: https://app.publitrac.com/login?lang=fr_CA
2. Enter the salesperson’s username and password.
3. Click Authenticate.
The page containing the leads that are assigned to the salesperson is displayed.
Accessible features via a salesperson access:
1. Send your questions: displays a dialog box allowing to send questions directly to PUBLITRAC.
2. Close the session: to exit PUBLITRAC.
3. Select your list: by default, the salesperson has access to only one list, My leads. If
subsequently, other lists are added, they will appear on the drop-down menu.
4. Search: search engine that allows to quickly find a lead.
5. Add: allows you to manually add a lead in the database.
6. Lead identification number: by clicking on the link, you can access the profile and history of
the lead.
7. Email: by double clicking on the email address, you can send an email directly to this lead.
8. Access to different pages: allows you to quickly move from one page to another, or go directly
to a page.
4. Make sure that the salespersons receive a copy of the emails you send on their behalf.
- Add the name of the salesperson in question in his own list of contacts. Assign this list to the salesperson so that the mailings come from him.
- To assign a salesperson to his own list, he must be part of the leads. If he is not part of the leads, manually create the lead and enter his name as the designated salesperson.
- If he is part of the leads, you can add him to his list by opening his Lead Details page (double click his contact) and by entering his name as the salesperson.
- You can then check to see if the salesperson has received the email by consulting the Activities section of the Leads Detail page.
Assign a list to a salesperson
1. Select Leads, then Leads / customers.
2. Select the List management tab.
3. Select the desired list.
The window below is displayed
4. Click Advanced Options.
5. Select the salesperson who will be assigned to the list.
6. Click Save.