Configure alert campaign on a trigger
An alert is an email notification sent automatically by PUBLITRAC to a group (sales representatives, managers,...). This email alert will be triggered as soon as a visitor performs one of the actions described below (on your website, an email, etc.):
- a page or section visited on your Web site
- an email sent, bounced, or opened, an opt-out request or a link clicked in an email
- a lead created, merged or changed
- a lead that reached a predefined score or a modified score
- a subscription to your newsletter
- a discussion or message on chat
- a submission of a form
- ... Your needs will define the alerts to be programmed.
An alert email template is available in PUBLITRAC. This template can be modified with our email editor (add your logo, text, bold, italic,...). You can also import your own alert email in html.
The implementation of an alert strategy is done in three steps:
Step 1. Create the alert email to be sent to your team.
Step 2. Create the automated campaign that will send the alerts by identifying the trigger.
Step 3. Test your alert campaign
Step 1. Create the alert email to be sent to your team.
1. Select Content.
2. Select Alert from the submenu.
3. Click Add.

The screen below appears.

4. Name* the alert.
5. Add a Description (optional).
6. Select the Default Alert FR option for the default French alert Template* and the Default Alert EN option for the default English alert Template*.
If you select None, you will have to import your own template. Go to item 8 below.
7. Preview the template in French (or English) in the section Preview. You can change the default template with our email editor (add your logo, bold, italics,...).
8. Select Next.
The screen below appears.
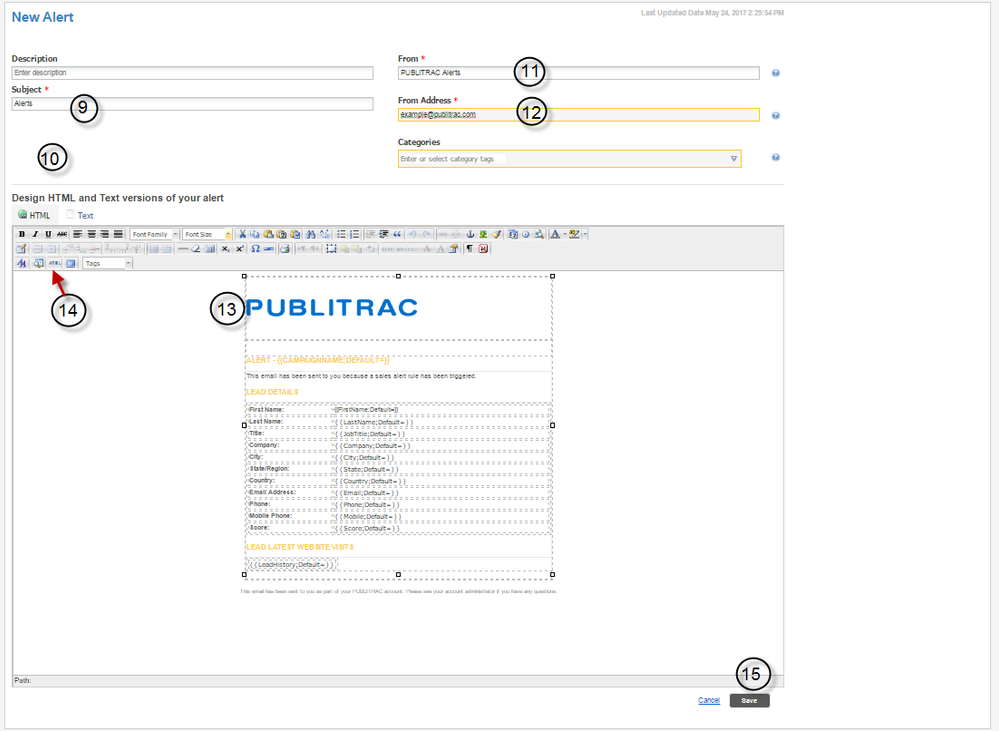

9. Specify the alert Subject*. The name of the alert Subject will appear in your Inbox. For example, New Subscriber alert, or Request Submission alert,...
10. If you clicked No in point 6 (meaning that, you will use your own alert email template and not the PUBLITRAC Default Alert EN or Default Alert FR templates), you must select the Language* of the alert email that you will create. This language attribute will ensure that tags added to your alert results will be displayed in the language of choice. For example, for the Gender field, a French alert will display Femme and an English alert will display Woman.
11. Enter the sender address*. We usually indicate the Company Name. For example, the alert emails created for company Xyz Inc. would indicate Xyz Inc. as the sender address.
12. Add the issuing address*, which is the Email address from where the alert email comes from. For example, alert@xyz.com
13. In the section Design HTML and Text versions of your alert, customize the desired fields of the alert from the WYSIWYG editor. You can add your logo, add bold, italic,...
14. If you wish to import your own alert template, select the HTML icon in the editor and make a copy and paste of the HTML code of your alert in the HTML source editor (the Editor appears after the click on the HTML button).
15. Click Save.
Step 2. Create the automated campaign that will send alerts by identifying the trigger.
Once the alert email is created, we must set up the automated campaign that will send the alerts by identifying the trigger from which the campaign will be activated. For example, when a form is filled out, or a Website section visited or Email opened, etc., the alert campaign 'Form filled out' or ' website section visited’,... will send an alert to a pre-selected group (sales representatives, managers,...).
1. Select Campaigns.
2. Select Configure automation campaign.
3. Click Add.

The screen below appears.

4. Name the campaign.
5. Select a Category.
6. Click Next.
The screen below appears.

7. Run the campaign on a Trigger.
8. Select, for example, Filled out Form in the list of triggers on the right and with your mouse, drag it to the left.

9. To continue with our example of Filled out Form, select the Form on which to apply this campaign.

10. Click Next.
The screen below appears.

11. Select the Automation tab. Because the sending of an alert is an Activity, you need to select among the following activities, which one or ones you will add to the Automation tree.
- Assign to the sales team, send alert type {x}: applies only if you have set up accounts for your representatives (limited access, the representatives have access only to their assigned leads). The alert type {x} is the name of the alert that you have chosen to send.
- Assign to {x}, send alert type {y}: assigns the lead to sales representative x and sends him the selected alert.
- Send alert {y} to {x}: sends the selected alert to a specific email.
- Notify the assigned sales representative, send alert type {y}: applies only if you have already assigned a sales representative to your leads. Sends the selected alert to the sales representative.
12. In our example, select the activity Notify the assigned sales representative, send alert type x under the Activities folder and drag it to the left to the Start folder.
The screen below appears.

13. Select the Alert that will be sent to the sales representative. Click OK.
14. Return to the Details tab.
15. Click Activate.
16. Click Save. Your campaign to send alerts is now activated.

Step 3. Test your alert campaigns.
We recommend to perform a test campaign on your alerts.
1. Choose Campaigns.
2. Select Configure automation campaign.
3. Click Add.

The screen below appears.

4. Name * the campaign.
5. Select a Category *.
6. Click Next.
The screen below appears.

7. Select Lists.
8. Create a list that contains only your email address. Use this list as needed for all the tests you need to perform. In our example, we created the list a.

9. Click Next.
10. Select the Automation tab.

11. Drag the activity Send alert {y} to {x} to the left.

The screen below appears.

12. Enter the Email address to who the alert will be sent to.
13. Choose the Alert to be tested.
14. Click OK.
15. Return to the Details tab.
16. Activate the campaign.
17. Click Save.
