Alert (create an alert email, score group, alert trigger)
The implementation of a scoring strategy and score alert is done in three steps:
Step 1. Create the alert email to be sent.
Step 2. Create the score groups.
Step 3. Create the score alert trigger.
A score alert can be configured and sent automatically as soon as a lead does an action indicated in a score group. Examples of score groups: added to the list, email clicked, email opt-out, email opened, email bounced, chat discussion, remove list, form, lead created, click web site link, message on chat, web page visited, section of web site visited.
Once a certain score is attained by your lead, PUBLITRAC automatically sends an alert indicating that the score has been reached.
Step 1. Create the alert email
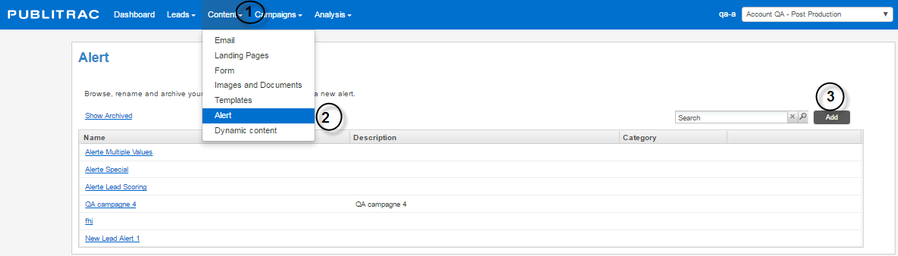
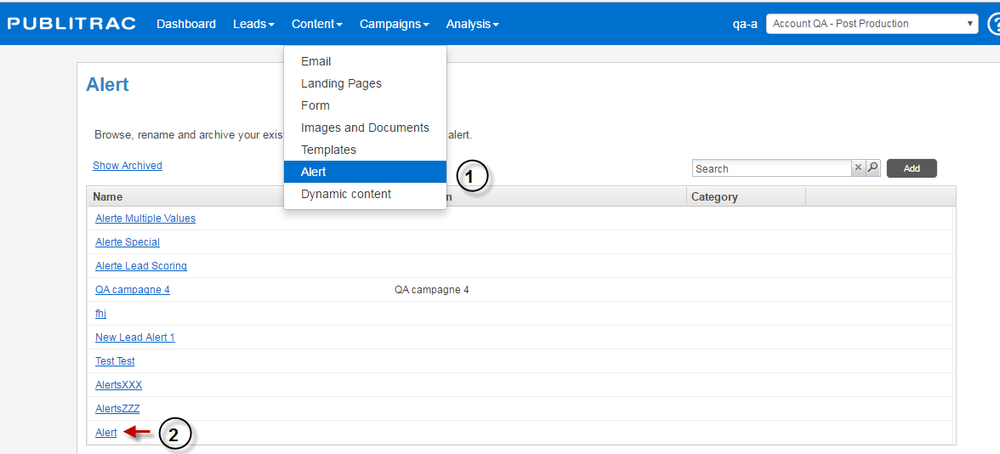
1. Select Content.
2. Select Alert.
3. Click Add.
The screen below appears.
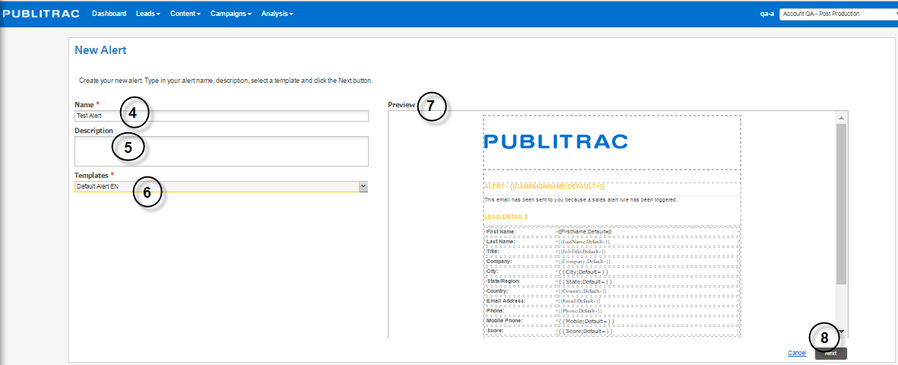
4. Name* the alert.
5. Add a Description (optional).
6. Select the Template*. Both French and English email alert templates are available by default. These templates can be modified with our email editor (add your logo, text, bold, italic,..., see Point 13). You can also import your own alert email in html by selecting None (go to Point 8 below).
7. Preview the template in French (or English) in the section Preview.
8. Click Next.
The screen below appears.
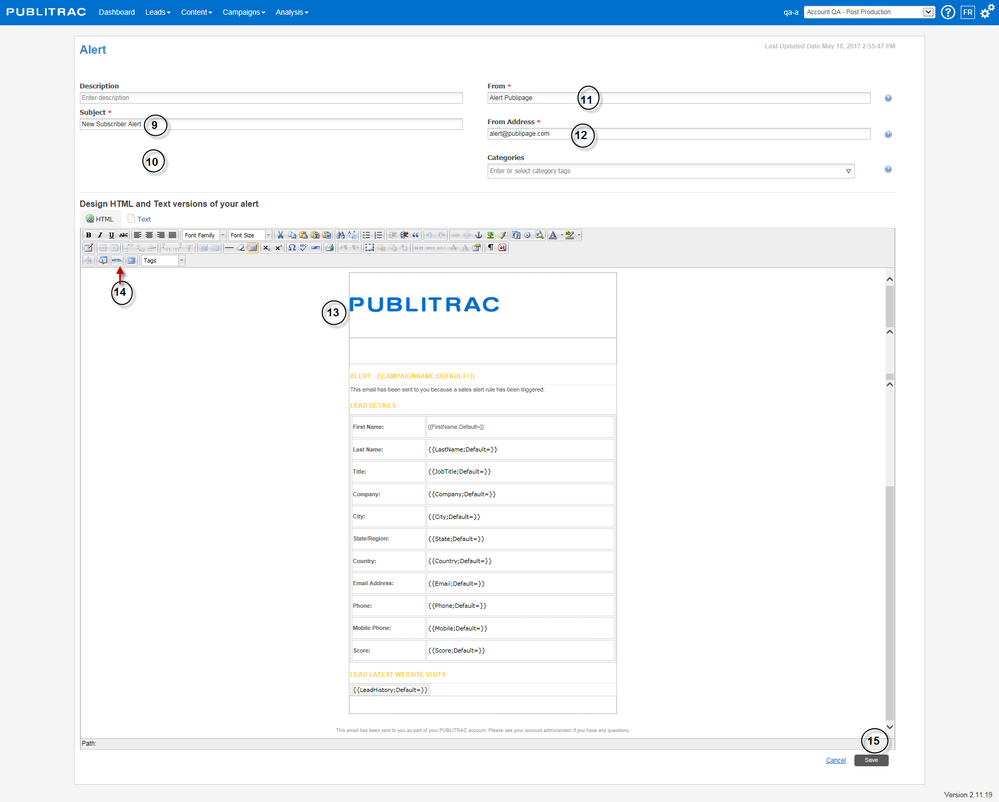
9. Specify the Subject* of the alert. The name of the subject of the alert will appear in your Inbox. For example, New Subscriber Alert, or Request Submission Alert,...
10. If you clicked None in Point 6 (which means that you will use your own alert email template and not the default templates in PUBLITRAC), you must select Display language* for the alert email you will create. The display language will show the choice of values for the tags of your alert in the language of your choice.. For example, in our example in Points 13, 14 and 15, for the Gender tag, the alert in French will show Femme and the alert in English will appear as Woman.
11. Enter the Issuer name (do not write the email address)*. We usually indicate the Company name. For example, Alert your company as the sender address.
12. Add the issuing address*, that is, the email address from where the alert email comes from. For example, alerte@your company.com
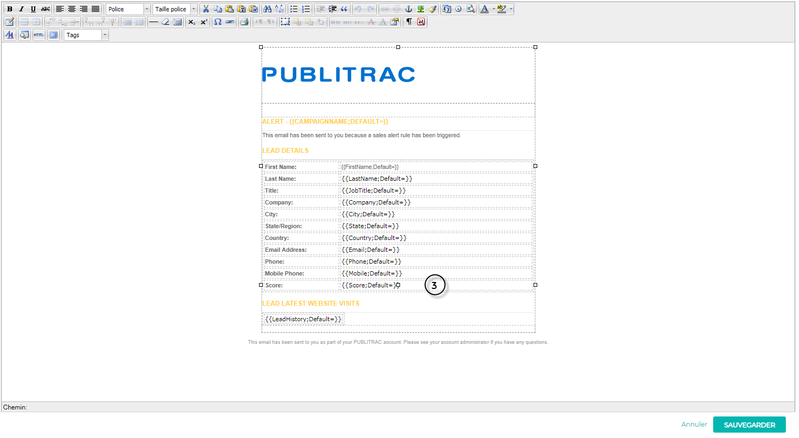
13. In the section Design HTML and Text versions of your alert, customize the fields of the alert from the menu bar. You can add your logo, add bold, italic,...
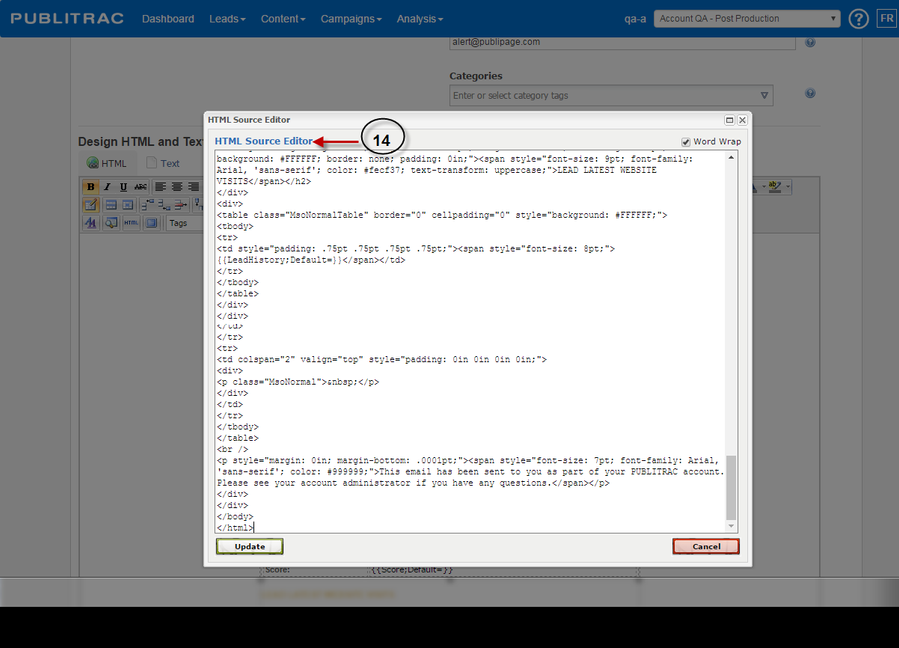
14. If you want to import your own alert template, select the HTML icon and do a copy and paste of the HTML code of your alert in the HTML source editor (the editor appears after the click on the HTML button).
15. Click Save.
Step 2. Create the score sets
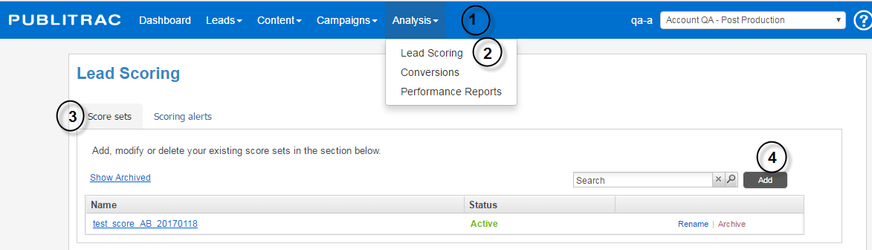
1. Click Analysis.
2. Select Lead Scoring.
3. Select the Score sets tab.
4. Click Add.
The Lead Scoring window appears.
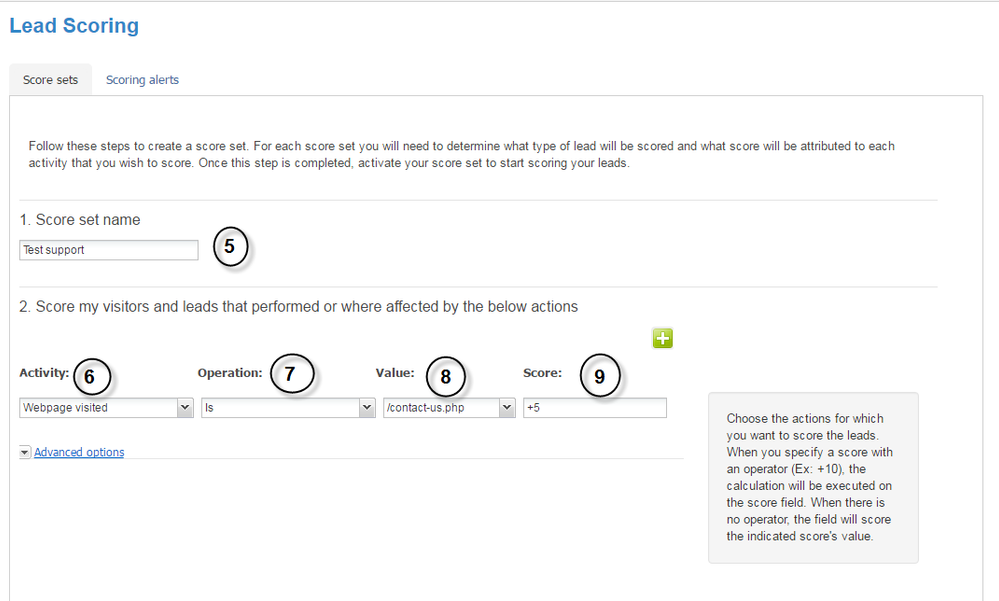
5. Name your score group.
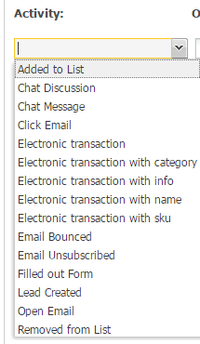
6. Choose the lead Activity to which you want to assign a score.
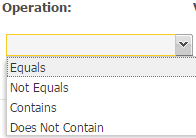
7. Choose the Operation to apply to this activity.
8. Enter the Value or the result of the activity and operation
Example 1: Activity: Form completed
Operation: Is
Value: Name of the completed form (form "Contact us")
Example 2: Activity: Email opt-out
Operation: Is
Value: Name of the email from which you want to follow the opt-out ("Fall Promotion" email)
9. Enter the Score to be applied.
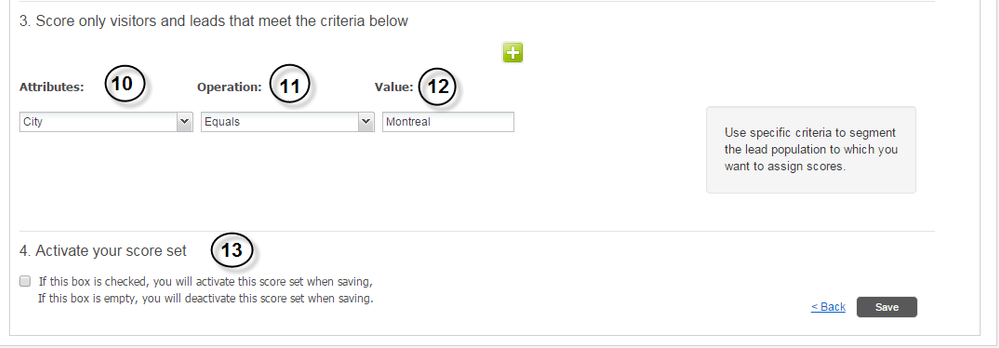
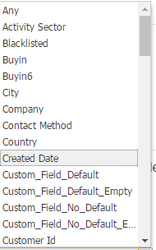
10. Select the Attributes of the leads (see screen below) you wish to target. For example, you can choose the leads that live in Montreal by the City attribute. In doing so, your score assigned to the chosen activity will be allotted only on leads residing in Montreal. The attributes present in this list correspond to the fields found on the page Lead Detail (default and custom fields, both appearing in alphabetical order and combined). You can add other attributes to your Score Group by clicking on  .
.

11. Choose the Operation to apply to this attribute.
12. Enter the value or the result you want to assign to this attribute (for example, attribute City, Operation Equal, and the Value would be Montréal in order to have the leads having done the identified activity but only for those living in Montreal).
Example 1: Attribute: City
Operation: Equals
Value: Name of the desired city (e.g. Montreal)
Example 2: Attribute: Type
Operation: Equal
Value: Desired gender (male or female)
13. Check the Activate your score set box to activate your group. If the box is not checked, your score group will be saved, but not activated (the statuses Active or Inactive of each score set are displayed under Analysis /Scores Prospects).
Step 3. Create the score alert trigger.
A score alert is an email sent to a sales representative or to your sales team, or to..., to notify them that a lead from your database has reached a score that you feel is appropriate to initiate a contact with them.
1. Access Analysis, then Lead Scoring.

2. Select the Scoring alerts tab.
The screen below appears.

3. Click on the  icon to define a new alert.
4. Enter the email address to whom the alert will be sent and the alert template that you want to activate.
5. Check Assign to sales team or Notify sales representative by selecting the representative from the drop-down menu (this field displays the list of the sales representatives that you created in PUBLITRAC under Settings / Configuration / Sales Team).
6. Select the score which will act as a trigger for the alert in Notify when the score is over or equal to. For example, if a lead reached a score of 5 following a completed form or following a visit on a page of your website, your sales team (or a sales representative), will receive an alert. There is no limit for the score.
7. Remove a score alert by clicking on the  icon at all times.
8. Click Save.
 TIPS
TIPS
- It is recommended to set up alerts upon the initial creation of forms in PUBLITRAC. Allows you to be notified for each completed form.
- Comments left on a form by your leads can be displayed directly on the alert.
Create a custom field to collect comments left on the form.
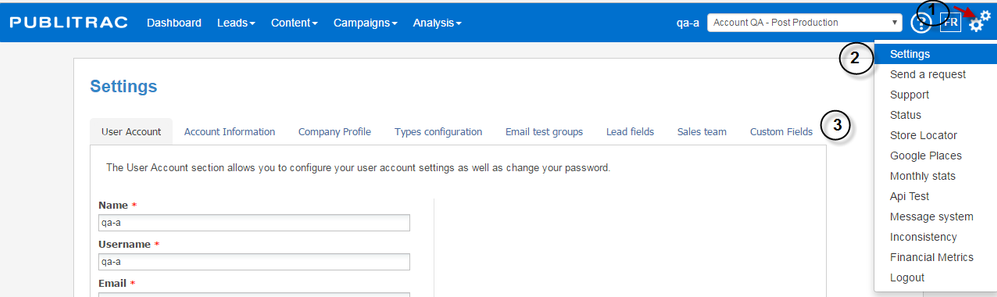
1. Select ![]() to access the configuration.
to access the configuration.
2. Select Settings.
3. Select Custom Fields.
The screen below appears.

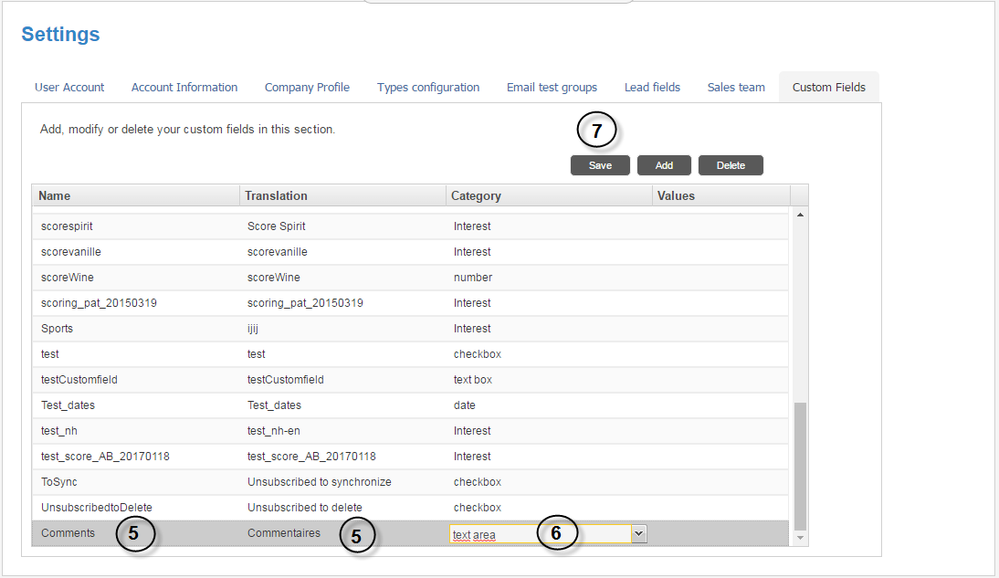
4. Select Add.
5. Name your custom field. In our example, Comments and Commenatires for the translation.
6. Choose the Category. If you choose Multiline text, a long comment with text and numeric characters will be accepted. A maximum of 512 characters can be inserted.
7. Save.
Combine the Comments field on your form to the custom field Comments in PUBLITRAC.
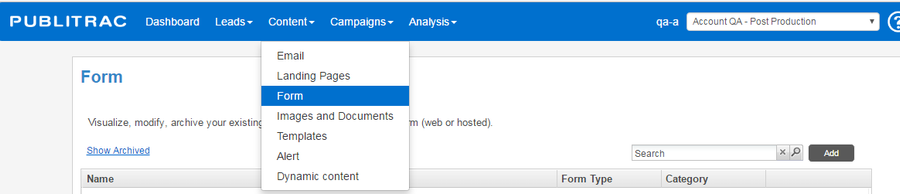
1. Select Content and Form.
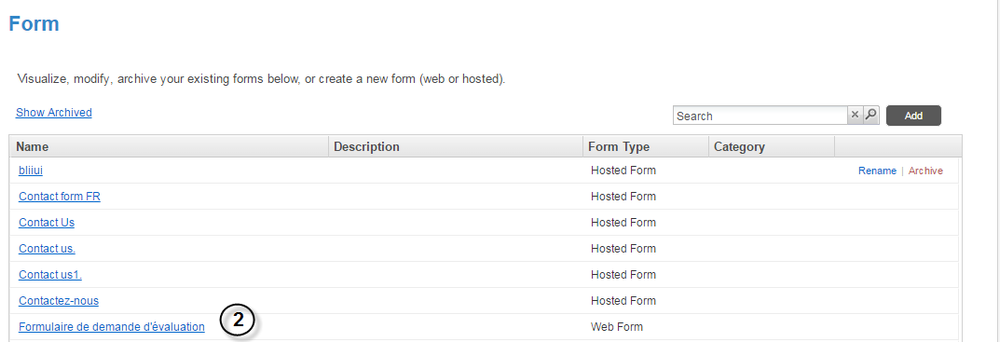
2. Choose the form to be matched.
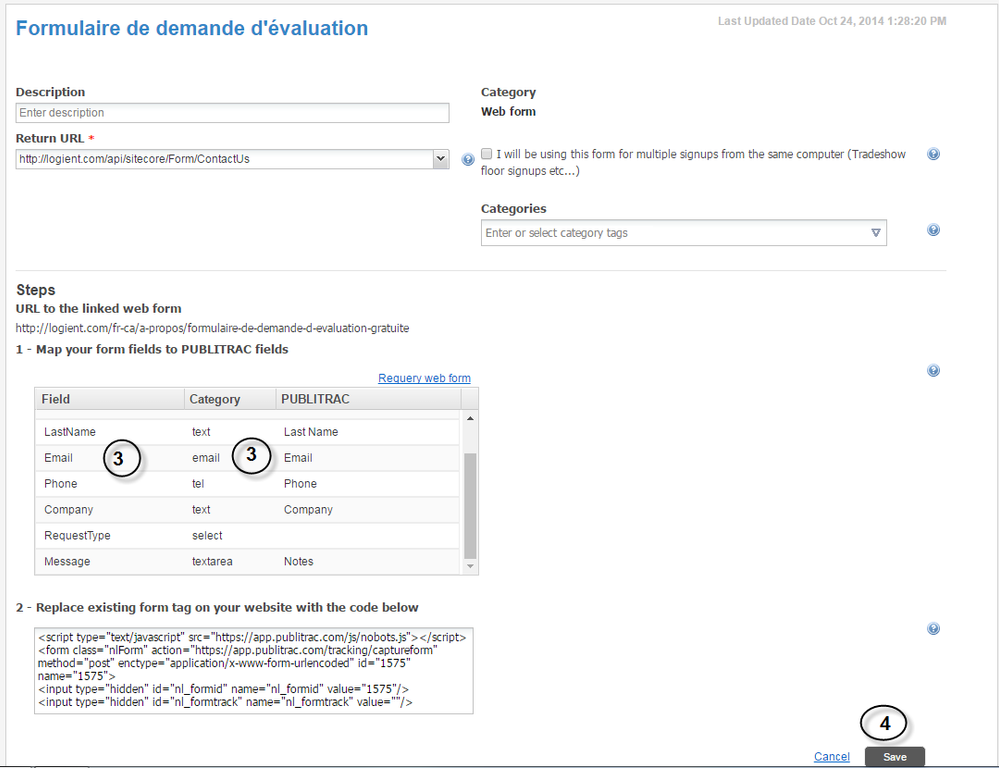
3. Match the field in your form to the corresponding custom field in PUBLITRAC.
4. Save.
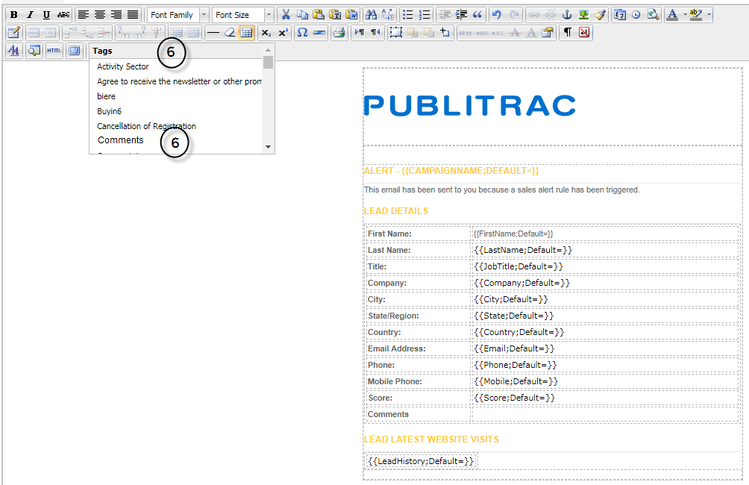
Add the custom field to your Alert
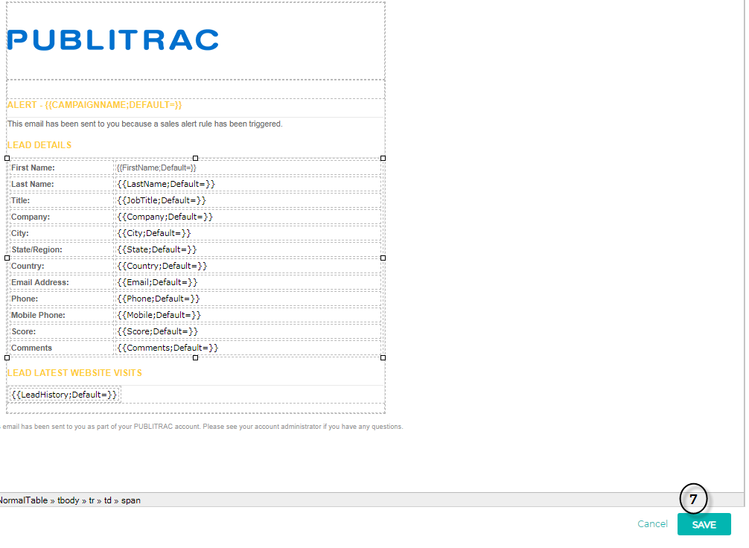
1. Select Content and Alert.
2. Select the Alert desired. In our example,Alert.
The screen below appears.
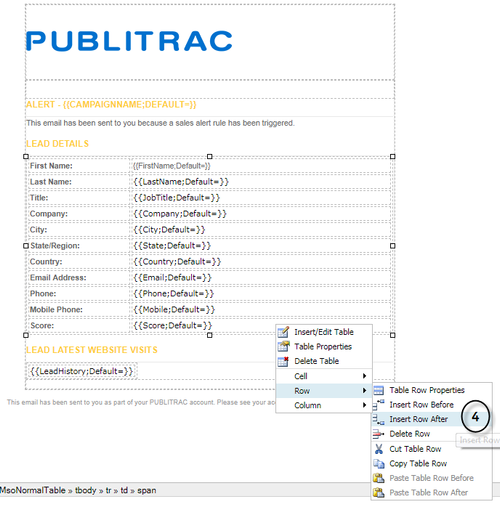
3.Right-click on the field prior to where you want to add a new one.
4. Choose Insert Row Before or After according to where you wish to insert the new field
5. Enter the name you wish to give this new field
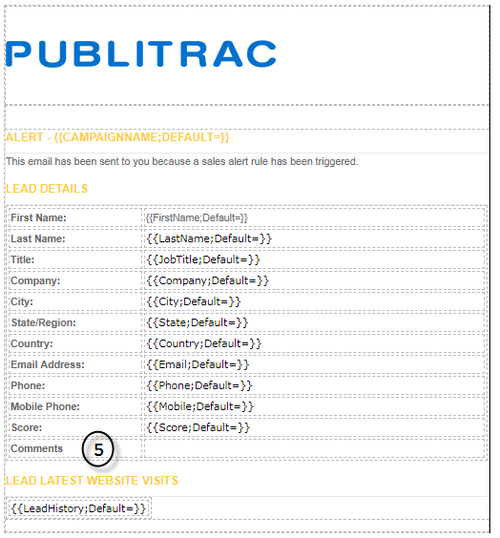
6. Click in the space where you need to enter the tag. Open the Tags drop-down menu. Choose the tag corresponding to your custom field which will display the comments once the alert is received by the recipient. In our example, Comments
7. Save.